
Many products around us are exposed to changing temperatures daily. From smartphones to electronics and outdoor machines, all undergo heating and cooling in their lives. These temperature changes seem very normal at first. But over time, they can highly affect the performance of products and make them weak. That’s why manufacturers must know how that specific product will perform in such conditions. That’s where the Temperature Cycling Test (TCT) comes in. If you are new to this test terminology, it might seem technical. But this Detailed Guide on Temperature Cycling Test (TCT) will make things easier for you. I will discuss what TCT is, how it works, and why it is important. So let’s get started.
What is a Temperature Cycling Test (TCT)? An Overview

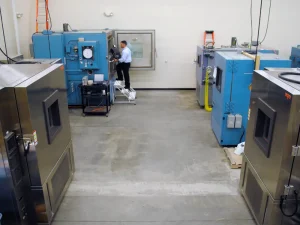
A Temperature Cycling Test (TCT) is a reliability test that checks how well a product reacts to repeated high and low temperatures. During the test, the product is repeatedly heated and cooled in a controlled test chamber. After that, the manufacturer sees whether the product continues to work or fails.
In simple terms, TCT helps manufacturers know the true strength of a product. There are several products, especially electronics, that are very sensitive to temperature changes. A slight temperature change can affect their performance and lead to failure. But with the help of TCT, manufacturers know about their hidden issues. After that, they can produce a product that remains more reliable in real life.
Actually, as a product heats up, its materials expand slightly. When it cools down, they shrink again. These small changes happen every time the temperature changes. At first, they might not affect the product’s reliability. However, after many cycles, they put stress on the product and cause hidden problems such as cracks, loose connections, or damaged parts. TCT is what helps reveal these issues earlier. It is used in automotive, aerospace, medical, and many other industries.
Why is Temperature Cycling Testing Important?
As you can notice, products are not always used in places with the same temperature. They may become very hot during use and cool down when turned off. They also face outdoor weather. This heating and cooling happen again and again throughout the product’s life.
At first, these temperature changes do not quickly deteriorate the product’s efficiency. But after repeated cycles, they actually weaken the product and even cause failure. However, TCT helps manufacturers determine whether a product can handle these repeated changes. They know hidden problems in products that are not easier to detect by any other test.
Manufacturers now identify the real issues earlier. So, they improve the product before it reaches customers. It means this test also makes the product more reliable and safer. It reduces the chances of unexpected failures and lowers repair and warranty costs. Now customers have peace of mind and confidence in that product.
How Does a Temperature Cycling Test Work? Step-by-Step Process
Now you have a basic idea of what TCT is and why it is so important. Right? Next, know that this test is not performed randomly. Instead, it takes place in a controlled, step-by-step manner. For better understanding, let’s dive in and discuss how a TCT test actually works and how to perform it.
Step 1: Prepare the Test Sample
The very first step in TCT is to prepare the sample that will be tested. Before it goes through the test chamber, engineers check that the sample is clean, complete, and in good working condition. They also make sure that this sample does not already have any damage or cracks. At this stage, the product may be measured, photographed, or tested to record its condition. These records help the engineers compare the product before and after temperature cycling.
Step 2: Place the Sample in the Test Chamber
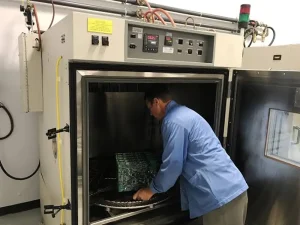
Once the sample is ready, place it in the temperature test chamber. This is a special machine that can create both very high and very low temperatures in a controlled way. So, the sample is positioned correctly so that all parts of it are exposed to the same testing conditions throughout the test. They also make sure that the sample is not placed too close to the walls of the chamber. There should be enough space for the air to move freely. This helps the entire product heat up and cool down evenly.
Step 3: Set High and Low Temperature Limits
After that, the sample is correctly placed in the test chamber; you cannot proceed with the test quickly. Instead, you have to set high and low temperature limits first. These temperature limits are selected based on the product’s expected working environment. Some of these limits are set slightly more extreme than the product will face in real life. But remember, the heating and cooling should not be too high. For the right temperature range, manufacturers usually follow industry standards or product specifications.
Step 4: Heat the Sample
After you have set the temperature ranges, the test chamber begins heating the product to the selected high temperature. It raises the temperature in a controlled way, not all at once. As the product becomes hotter, the materials inside it begin to expand slightly. This creates small amounts of stress between connected parts. This stress is what disturbs the performance of the product. The sample is kept at a high temperature for a specific period. This holding time gives the engineer a realistic idea of the product’s behavior at high temperatures.
Step 5: Cool the Sample
Now the sample has stayed at a high temperature for a long time. Right? Next, it is time to expose it to a low temperature. The test chamber begins to cool the sample down to the selected low temperature. Once the required range is reached, the materials inside the product begin to shrink slightly. This shrinkage again puts stress on different internal parts of the product. At this low temperature, the sample is again kept for a set period.
Step 6: Repeat Multiple Temperature Cycles
After the first cycle of heating and cooling, the process does not stop here. Instead, the sample is repeatedly exposed to heating and cooling cycles. Why? Because a single cycle cannot determine a product’s actual strength. So, the test chamber keeps changing its temperature from low to high and high to low. This continues for a thousand or hundreds of cycles. Each heating and cooling cycle adds a small amount of stress to the product. Over time, this can lead to tiny cracks, loose solder joints, and damaged seals if the product is of poor quality.
Step 7: Inspect & Evaluate the Sample
After the temperature cycle, the sample is finally removed from the test chamber. Now, engineers examine it for any visible signs of damage, such as cracks, loose parts, warping, and broken seals. After that, they test its performance by using it and observing how it responds. Finally, all the test results are recorded and analyzed. If the product shows no wear and performs well after repeated cycles, it passes the test. However, if any sign of failure arises, it is rejected. Manufacturers might remanufacture it or improve its design.
Temperature Cycling Test vs Thermal Shock Test: What’s the Difference?
Temperature cycling and thermal shock both test how products react to changing temperatures. That’s why many get confused and assume they’re similar. But in reality, there are the biggest differences between these two tests. In temperature cycling, the product is gradually heated and cooled. This test gives the sample time to adjust to each temperature.
It means TCT is mainly to evaluate how a product responds to repeated temperature changes but over a long period. It basically helps reveal problems that develop slowly, such as material fatigue, small cracks, or weakened joints. On the flip side, in a thermal shock test, the product is moved very quickly between extremely hot and extremely cold temperatures.
It does not give the product time to adjust but exposes it to sudden temperature changes quickly. So a thermal shock test checks whether a product can survive those sudden temperature changes without failing. That’s why each of these tests has its unique purpose. Manufacturers choose the test based on those conditions the product is likely to face during its actual use.
Factors That Can Affect Temperature Cycling Test Results
The results of a temperature cycling test do not depend only on the test itself. Instead, there are many other things that can affect how a product actually behaves in changing temperatures. Knowing those factors is crucial for evaluating a product’s reliability. So here are some factors that can affect TCT results.
- Type of Material: The first factor that affects how it responds to temperature changes is material type. When a product gets hot, its materials expand. When it gets cold, they shrink. However, not all materials expand and contract equally. This difference directly changes results.
- Product Design: Secondly, product design also changes the TCT result. A well-designed product allows heat and cold to spread more evenly. This reduces unnecessary stress and helps products perform well. But a poor design may create areas where stress becomes concentrated.
- Manufacturing Quality: Manufacturing quality is just as important as its design. If the product is assembled with high-quality materials, it is more likely to pass the test. But poor manufacturing creates weak points that will fail during the test.
- Temperature Ranges: The right temperature range setting has a direct effect on TCT results. A larger temperature range puts high stress on the product and varies the result. However, if the temperature range is too low, the test will not show the product’s real strength.
- Humidity: Sometimes humidity is also added to the test alongside temperature changes. Moisture basically causes rust and corrosion in the product. When both temperature changes and humidity work together, products face more challenging conditions. This helps manufacturers better understand the product’s reliability.
Conclusion
The temperature cycling test is one of the most important parts of many industries. It helps reveal how a product reacts to changing temperature conditions. In this article, I have discussed everything you need to know about TCT. For example, in this test, the sample is first placed in the test chamber. The chamber continuously alternates between low and high temperatures.
These continuous cycles cause the product’s internal part to shrink and expand. Now, a manufacturer can see whether a product can withstand these changes. If yes, it is considered reliable for real use. However, if they find any cracks or damage, the product is improved. It means TCT confirms the product’s actual strength and prevents sudden failure and serious accidents.