
Some products work well at normal temperatures. But they start to deteriorate when temperatures change suddenly. Electronics, automotive parts, and batteries are common examples of items that face this issue. So, have you ever wondered how manufacturers ensure their products perform well in those temperatures? The answer lies in thermal shock chambers. These specialized machines test a material in both too-cold and too-hot environments. They help manufacturers understand their products’ real strengths. When looking for a thermal shock chamber, you will usually come across 2-zone and 3-zone models. They might look the same but in reality differ a lot. So, 2-Zone vs 3-Zone thermal shock chambers: which is the most reliable? If you don’t know, worry not! In this guide, I will compare both thermal shock chambers head to head. So let’s get started.
2-Zone vs 3-Zone Thermal Shock Chambers: Key Differences
In thermal shock testing, a material or product is shifted from a hot to a cold environment and from a cold to a hot environment. There is no doubt that both 2-zone and 3-zone thermal shock chambers test a material against these changes. But they do this in different ways. So what actually separates them? Let’s look at the key distinctions between the two.
1- Chamber Design & Zone Arrangement
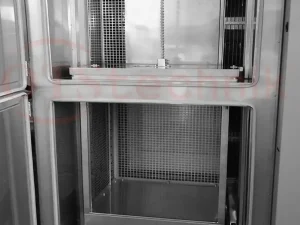
The first major difference between 2-zone and 3-zone chambers is their layout. If we discuss a 2-zone thermal shock chamber, it has two separate temperature areas. The first zone is cold and the second is hot. The test sample moves between these two areas. When the sample needs a hot condition, it goes into the hot zone.
When it needs a cold condition, it moves to the cold zone. On the flip side, a 3-zone thermal shock chamber has one more area in its setup. Along with the hot and cold zones, it has a third zone known as the ambient zone. This zone stays around normal room temperature. This gives the sample a third temperature condition between the hot and cold parts. When samples need to rest at room temperature, they use an ambient zone.
2- Temperature Change & Transition Speed
In thermal shock testing, how quickly the sample moves from one temperature to another matters a lot. In this term, the 2-zone chamber stands out. Why? Because it has only two temperature states: hot and cold. The sample directly moves between the hot and cold zones, so there is no long waiting period.
However, the 3-zone thermal shock chamber also has a third zone (ambient). This means the sample must also pass through this zone or stay there for some time. However, this does not mean the 3-zone chamber is always slower. The actual speed mainly depends on the test setting and chamber condition.
3- Testing Method & Sample Movement
The sample is the part that takes the temperature trip during the thermal shock test. Its movement varies between the two thermal shock chambers. For example, in a 3-zone chamber, the sample has another place to move: the ambient zone. This zone is kept near normal room temperature. The sample might move from hot to ambient, ambient to cold. That totally depends on the test setup.
Sample placement in ambient movement is crucial for many types of materials. In contrast, the 2-zone chamber uses a basket to carry the sample. This basket repeatedly moves the sample from the hot zone to the cold zone and back. The sample might spend a set amount of time in one zone before moving to the other. This hot-to-cold movement is repeated for the set number of cycles.
4- Temperature Recovery & Stability
After a sample moves out of a hot or cold zone, the chamber has to get ready for the next part of the test. This is called temperature recovery. For example, if the sample leaves the cold zone, that zone must return to its set temperature before the next cycle. That’s another area where 2-zone and 3-zone shock chambers differ clearly.
In a 2-zone chamber, the hot and cold zones generally need to recover temperature. The sample moves between them, so both zones need to stay ready for the next move. However, in a 3-zone chamber, the ambient zone also needs temperature stability and recovery. This gives the sample a normal-temperature area when the test requires one.
5- Testing Flexibility & Control
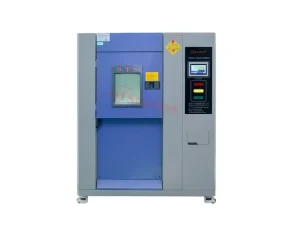
When it comes to testing flexibility, the 3-zone thermal shock chamber is the winner. As I said above, it has an extra ambient zone. This gives you one more temperature area to work with. For example, if a sample has to stay at room temperature, you don’t need to use another chamber.
The 3-zone chamber’s ambient zone helps with that. However, 2-zone chambers don’t offer the ambient zone. You can only move the sample from hot to cold and cold to hot. However, that doesn’t mean you don’t have flexibility in temperature settings. You can still have control over different temperature ranges.
6- Ambient Exposure & Temperature Conditioning
Sometimes, a test doesn’t need to jump straight from very hot to very cold. The product also needs to sit at normal room temperature for a certain period. This is known as ambient exposure. It allows the sample to return closer to normal conditions before the next temperature change.
If that’s the requirement of any sample, then 3-zone chambers truly stand tall. It has a real ambient temperature zone that is at normal room temperature. So you can easily place your sample in that zone. However, the 2-zone chamber is not meant for ambient exposure. Its main job is to move the sample between hot and cold conditions. If you need an ambient step, the test setup will need to handle it another way.
7- Energy Use & Operating Efficiency
Now it comes to energy usage that differentiates the 2-zone and 3-zone thermal shock chambers. Basically, a 2-zone chamber is more energy efficient. Why? The reason lies in its simple setup. It uses only two zones: the hot zone and the cold zone. These two areas must stay at their set temperatures as the sample moves between them. These two zones use less energy than the 3-zone chamber.
This shock chamber has one extra temperature-controlled area. In addition to the hot and cold zones, it also has an ambient zone. This means the chamber has another area to control and maintain. This extra zone uses slightly more energy when in use. But remember, it is wrong to say that every 3-zone chamber consumes more energy. Its actual power usage depends on the design, insulation, cooling system, and temperature settings.
8- Sample Size & Testing Capacity
When you test large parts or several samples at once, the thermal chamber’s testing capacity matters. Generally, a 3-zone chamber has an extra ambient zone. So the inside is arranged around three temperature areas instead of two. This can help you hold more samples.
Still, its original capacity depends on chamber volume. For sample size, the 3-zone chamber holds samples based on basket size. A 2-zone thermal shock chamber is originally designed for small to medium sample sizes. It has a simpler internal setup because samples travel between the hot and cold zones.
9- Maintenance Needs & Ease of Operation
Maintenance needs vary with the chamber’s complexity. Right? So, with the 2-zone thermal shock chamber, the setup is more straightforward. There are only two zones for cooling and heating. So for beginners, it is much easier to operate and understand this 2-zone chamber. Fewer zones also mean less maintenance.
They are easier to clean, maintain, and even replace. However, a 3-zone chamber includes an ambient zone, which makes it slightly more complex. Another area and set of controls are involved in the testing process. No doubt it gives you more testing options but also involves complex operation and requires skills to operate. The operator has to understand how the sample moves between all three zones and how each zone should be controlled.
10- Purchase Cost & Long-Term Expenses
Lastly, there is a purchase cost that varies between 3-zone and 2-zone thermal shock chambers. Cost mainly depends on the system’s complexity. So a 2-zone chamber has a simpler setup with hot and cold zones. This often makes it the more budget-friendly option. If your tests only need these two temperature conditions, you don’t need to spend extra money on a third zone.
A 3-zone chamber has an additional ambient zone. This is what makes it more expensive. You’re paying for extra testing flexibility. This makes more sense when you actually need that extra temperature condition for your product. There are also costs after you buy the chamber. Both types use electricity and need cleaning, maintenance, calibration, and occasional repairs. But 3-zone chambers have more parts to manage, which may increase maintenance costs.
Conclusion: 2-Zone vs 3-Zone Thermal Shock Chambers: Which Should You Choose?
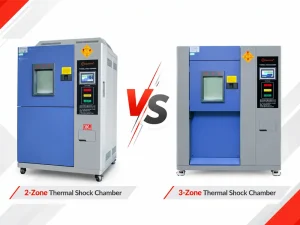
There is no single best choice between a 2-zone and a 3-zone thermal shock chamber. Your choice depends on your needs.
For simple hot-to-cold thermal shock tests, choose a 2-zone chamber. It has a simpler design, is often easier to operate and maintain, and costs less. However, if your test needs hot, cold, and normal room-temperature conditions, a 3-zone chamber is the better fit. The extra zone gives you more ways to run the test.
In this guide, I have discussed the major differences between 2-zone and 3-zone chambers. These differences give you a better idea about their real pros and cons. So you should choose based on your needs. A 2-zone model makes sense when you mainly need fast changes between hot and cold. You don’t need to pay extra for an ambient zone you will not use.
It is also easier to operate and maintain. However, a 3-zone model is handy when your test plan includes an ambient step. It comes at a higher price, but its testing flexibility compensates for it. Some samples need to pass through normal temperature. The ambient zone provides those conditions. So if your testing needs ambient exposure, don’t worry about the cost, but choose it for flexibility.